Showing posts with label Cabinets. Show all posts

Thursday, September 20, 2012

Medicine Storage

Last Christmas, yes almost a year ago (can you believe Christmas is only 3 months away?! Me neither!!), while we were staying with my in-laws I got sick with a really bad sinus infection. It was not fun, but I got to see my mother-in-law's medicine cabinet and I was in awe. She had everything labeled neatly and divided up into categories. It was then that I knew I wanted to do that to our medicine. So now, about 10 months later, I finally have an organized medicine cabinet and I am pretty excited about it!! 

We have this awesome corner cabinet in our kitchen that has doors on both sides. It's about the only cabinet I like in our kitchen. It has always been the home to all of our vitamins and medicine, but it used to be really ugly and look like this:

With some inexpensive bins and a double-tiered lazy susan from Walmart, along with some washi tape labels, it's a whole new space!

Check it out!!

Here is the view from the back, this opens up into our eating area.


Here is what it looks like from the front, which opens up in the kitchen.
I put our most-used vitamins on the lazy susan for easy access each day.


 Washi tape has been really popular lately and there are so many uses for it, as evidenced all over pinterest! I learned about using washi tape for labels from the ever-famous and ever-wonderful iheartorganizing blog. Such a great idea! They are so easy to remove and change up.


I just sorted out all of our medicine and categorized them according to what we had.
My categories are:

Sleep Aids and Motion Sickness (I realize the way I abbreviated it on the label is kind of funny, but I wanted it to be shorter!)
Vitamins (These are the ones we don't use very often, but I can't bring myself to throw them away. YOU should always throw things away that you don't use, though! ;))
Eyes, Ears, Nose, and Throat
Tissues and Chapstick (We have about a million little packs of tissues and TONS of Chapstick!)
Fever and Pain
First Aid


Please ignore the fact that our white trim on the edge of the shelf fell off. I don't even know if it was there when we moved in or not. I didn't even notice until I was uploading the pictures. Oops. I know it looks super classy.


Am I the only one that didn't know that was how medicine should be stored??
I hope not. 

P.S. I am in the process of reorganizing my whole kitchen, so a kitchen cabinet tour will be up soon!
Be sure to follow and check back soon for that!!

Happy Thursday!! :)


Thursday, August 30, 2012

Medicine Cabinet Redo

Although we don't have any drawers in our bathroom, we are fortunate to have a large medicine cabinet over our sinks that stores so many things!
I love having a medicine cabinet to store our bathroom products because they are shallow and you can see everything really well.
We use them to store our everyday, most-used products. To see how we store the rest of our bathroom products, see our bathroom cabinet post!
 
I took these "before" pictures a few months ago, so the products we have may be different in the "after" pictures. Here is the process I went through to accomplish the end result.
 
1. I took everything out of the cabinet, section by section and cleaned thoroughly with a warm damp cloth.
2. I made a plan of where to put each thing that would make the most sense.
3. I put the organizers where they should go and put all of the products back in, with the labels in the front and made sure I could see everything.
 
It all works like a charm now!


On his side:
I added a larger medicine-cabinet-clear-acrylic-storage-container (wow! That's a mouth full!) from Target to store his everyday products and rearranged a few of his products.


In the middle section:
I used one of the smaller clear dividers we had (I found those at Ross a while back for $1.99 each!) to store our toothpaste and other "mouth products."
Then, I moved the white plastic container from my side to this section to hold my makeup primers, setting sprays, and other makeup that would not fit in my makeup holder (a makeup storage post is coming soon!). I store my makeup brush cleaners next to those (did you know baby shampoo works well to clean your brushes?! So much cheaper than the cleaners made for that!) 


On my side:
I used the other clear storage container to hold my tweezers, little scissors, and contact stuff.
The middle shelf holds all of my skincare products. Yes, I am a skincare product junkie.
The bottom shelf holds all of my hair products and my deoderant.


I love how it turned out! It is so much easier for me to put things away after I use them when I know that they have a place and that it looks so much better!
 
If we had this medicine cabinet in a more permanent home that we owned, I would definitely add some fun patterned paper to the back walls and maybe even a little chalk board paint to the back of the doors! :)
 
And there ya have it, my non-medicine medicine cabinet makeover!!
 
Does anyone actually use medicine cabinets for medicine anymore??
I know my grandparents did, but I can't imagine wasting prime bathroom storage space on medicine! Maybe if we had a bigger bathroom...
 
Let me know what you guys think and as always, if you have any requests!


Tuesday, August 28, 2012

Day 7: TV Cabinet

Last day of the challenge!
I will actually miss having a schedule of what to organize and blogging about it.
Maybe there will be more "7 Spots in 7 Days" Challenges in the future!
 
Anyway, today's project is not that great, to be honest.
I just wanted to get our TV cabinet in order and it really did not take much to make it look a lot better.


It took all of 10 minutes.
 

I added some baskets that we already had to hold all of the Wii and XBOX controllers and random parts and pieces. Are you so surprised I didn't label them?! Yeah, me too. I figured you can tell because I put the Wii Games with the Wii basket and the XBOX ones with the XBOX game.


I had already alphabatized the DVD's a couple of days ago, so that worked out nicely!


My next project is going to be to make a user manual binder with all of the random manuals from our TV, Wii, XBOX, Cable box, vacuum... all of those kinds of things! I'm sure I will do a post on that soon!
 
 
And... that was it!


Let me know if you guys take on the 7 Spots in 7 Days Challenge! It really motivated me to get those little projects done that I had been putting off!
 
Let me know if you guys have any organization requests! I would be more than happy to answer any questions you may have!
 
Thanks for reading!


Friday, August 24, 2012

Day 3: Bathroom Cabinets Before & After

I am not going to lie, this was not a quick project. I have been working all day on this, but I am so excited to post about it! I used a couple of pinterest ideas I have been wanting to try. They were cheap, but NOT quick. I had to take not 1, but 2 trips to Lowes today. I hate going to Lowes. I always feel like a fish out of water there. I should not have worn my pink pants today. I'll just leave it at that.
 
Our bathroom has been so hard for me to organize for several reasons:
1. We only have cabinets. No drawers. Drawers are easier to use to organize small things like makeup, face products, hair stuff, etc.
2. I am obsessed with all things beauty. Makeup, skincare, hair, nails, etc. Therefore, I have TOO much of all of it.
3. Using the vertical space in the cabinets has been a challenge.
4. I have just kept putting it off!

I think I finally have a system that works now!

I used this and this from pinterest on the doors on my side of the sink to store bobby pins and my most used curling irons (yes, I have 3 most used ones... I know I have problems).


 I used command strips to attach everything so it will not leave holes or marks. By the way, if you are going to attempt this, BEG the guy at Lowes to cut the PVC pipes for you. I am still sore. The guy told me they were only allowed to make one cut per pipe and to buy a cheap hacksaw and that it would cut like "butter." LIES. ALL LIES. It was really hard. Clay even helped me and it was hard to get the cuts straight, so mine are very imperfect, but they get the job done. Here's the aftermath in our living room:


I bought a cute wire basket at TJ Maxx for $7 to hold extra rolls of toilet paper and then used my favorite labels to label the bins on Clay's side of the sink (even though it's basically all my stuff, don't worry he has his stuff in the medicine cabinet, which I will post in another post!)


For "my side," I got 3 little bins from Wal-mart to hold hair accessories, used a "lazy susan" my parents gave me a while ago for lotions and a basket I already had for brushes, velcro rollers, my straightener, combs, and my hair dryer.


This was A LOT of work. I'm exhausted. I'm ready to eat some dinner, cuddle with my husband and watch some Desperate Housewives. I'll be back tomorrow with my Fridge organization.

Hope everyone has a great weekend!


Monday, August 13, 2012

Taming Under the Kitchen Sink

Oh my goodness, I am so embarrassed to post these before pictures. It looks like a bomb went off under there... please try not to judge me.
I don't know why it took me so long to tackle this project.
It took about $10 and an hour and now I don't have to cover my eyes every time I need something from under there!

So... here it is... the dreadful before:


With just a little reaaranging, a few bins (some that I already had), some labels that I already had, a tension rod, and some command hooks... it's a whole new space!

And...


After:

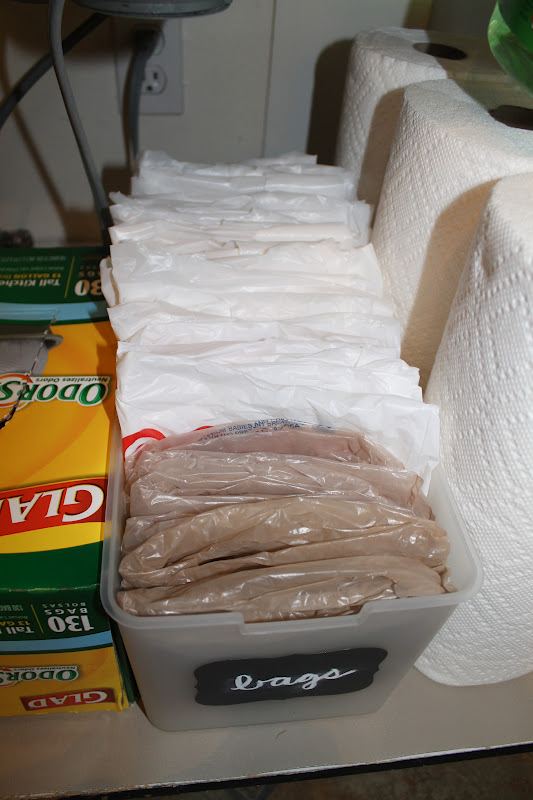
 Yeah, my OCD came out a little and I folded neatly some of the grocery bags that were shoved under there. I threw away a lot of them, who needs 50,000 grocery bags anyway?!


 This helps clear up the space around the sink and also let's the brush air out and prevents gross mildew!


I was able to move the small appliances that were cluttering it up to another cabinet and move my cleaners from the pantry under here. It looks so much better! There is even a little growing room to store more paper towels! That makes a crazy girl happy. :)